今天我们来聊聊 onRestoreInstanceState 和 onSaveInstanceState 这两个非生命周期却为大家所熟知的方法。
我们从 简书 app 的一个功能说起。
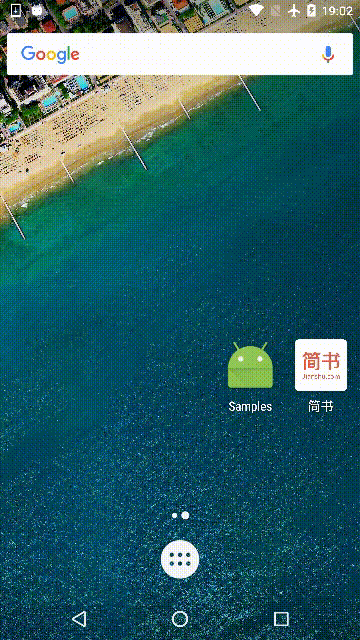
浏览过一个文章页面后,如果应用在后台被杀死,再次打开 app 时,会从首页自动跳转到上次浏览的页面以及浏览的位置。

而如果是正常的返回退出应用,再次打开 app 时不会进行自动跳转。
简书 自动恢复页面功能简单实现
话不多说先上代码:
// ItemActivity.

public static final String KEY_ITEM = "item";
public static final String KEY_SCROLL_Y = "scroll_y";

@Override
protected void onCreate(Bundle savedInstanceState) {
    // ...

    setTitle(getIntent().getStringExtra(KEY_ITEM));

    if (savedInstanceState == null && mSp.contains(KEY_SCROLL_Y)) {
        final int scrollY = mSp.getInt(KEY_SCROLL_Y, 0);
        mScrollView.postDelayed(new Runnable() {
            @Override
            public void run() {
                mScrollView.smoothScrollTo(0, scrollY);
            }
        }, 500L);
    }
}

@Override
protected void onResume() {
    super.onResume();

    mSp.edit().remove(KEY_ITEM).apply();
    mSp.edit().remove(KEY_SCROLL_Y).apply();
}

@Override
protected void onSaveInstanceState(Bundle outState) {
    super.onSaveInstanceState(outState);

    mSp.edit().putString(KEY_ITEM, getIntent().getStringExtra(KEY_ITEM)).apply();
    mSp.edit().putInt(KEY_SCROLL_Y, mScrollView.getScrollY()).apply();
}
// MainActivity.

@Override
protected void onCreate(Bundle savedInstanceState) {
    // ...

    mListView.setAdapter(new ArrayAdapter<>(this, android.R.layout.simple_list_item_1, LIST_VIEW_ITEMS));
    mListView.setOnItemClickListener(this);

    if (savedInstanceState == null && mSp.contains(ItemActivity.KEY_ITEM)) {
        final String item = mSp.getString(ItemActivity.KEY_ITEM, "0");
        mListView.postDelayed(new Runnable() {
            @Override
            public void run() {
                int position = Integer.parseInt(item);
                onItemClick(null, null, position, 0L);
            }
        }, 500L);
    }
}

@Override
public void onItemClick(AdapterView<?> parent, View view, int position, long id) {
    startActivity(new Intent(this, ItemActivity.class)
            .putExtra(ItemActivity.KEY_ITEM, LIST_VIEW_ITEMS[position]));
}
效果如下:

当然这只是一种可以达到效果的实现方式,在 ItemActivity 的 onSaveInstanceState 中使用 SharedPreferences 保存当前 Item 页面和 ScrollView 滚动的位置,在 onResume 中清除这两个值。因为正常按返回键退出 app,下次启动时不会自动打开上次浏览的页面。这就涉及到 onSaveInstanceState 的触发时机了。
onRestoreInstanceState 和 onSaveInstanceState 的触发时机
对于 onSaveInstanceState,在以下场景会触发回调:
- Home 键
- 熄屏
- 打开另一个 Activity
- 屏幕旋转(不止是屏幕旋转,任何未在 Manifest 中配置 configChanges 的 config 在改变时都会触发,只是屏幕旋转最常见也最容易观测)
总而言之,onSaveInstanceState 会在 非用户主动关闭 Activity 而又有可能导致 Activity 被回收而销毁 的时机调用,屏幕旋转是会立即销毁并立即重建 activity,如果是用户主动按 back 退出 Activity,这个方法不会被调用。
对于 onRestoreInstanceState,它不是和 onSaveInstanceState 配对调用的。onSaveInstanceState 被调用并不一定意味着 onRestoreInstanceState 在之后也会被调用,它只在 onSaveInstanceState 被调用且 Activity 的确被销毁的情况下,下次恢复 activity 时调用。例如:按 home 键触发 onSaveInstanceState,然后立即回到 activity,activity 还没有被销毁,是不会调用 onRestoreInstanceState 的。
也就是说:
onSaveInstanceState:如果你不是主动要退出,但目前的某个操作导致你处于可能被系统回收的状态,你可以在这里保存你当前的状态onRestoreInstanceState:如果你之前保存过状态,且你真的被系统回收了,你可以在这里恢复你保存的状态
onRestoreInstanceState 在 application 进程被杀死的情况下,例如,在应用信息中强制停止 app,或在 recent 界面中清除 app,则不会在下次启动时被调用。
另外,onCreate 生命周期方法中也提供参数 savedInstanceState。与 onRestoreInstanceState 不同的是:onCreate 中的 savedInstanceState 是可能为 null 的,onRestoreInstanceState 中的一定不为 null,只在有状态需要被恢复时,才会调用 onRestoreInstanceState。
回到上面的问题,在 onSaveInstanceState 中保存 SharedPreferences 是因为这符合“我的数据可能丢失”的情况,只是这里使用了持久化存储以便在即使应用被杀死的情况下也能恢复数据。在 onResume 中删除数据是因为我又回到了正常状态,如果这时候按 back 退出,这是用户的主动操作,我不需要在下一次启动是恢复数据了。之后在 onCreate 中判断是否存在已保存的数据,如果存在就恢复。判断的时候多加了一个 savedInstanceState == null 是因为这是针对应用被杀死后还能恢复的需求的,如果仍然存在可以恢复的数据,应该使用 savedInstanceState 进行数据恢复而不应该读取 SharedPreferences 进行数据恢复。
View 的 instance state.
等等,这个场景好像和 onRestoreInstanceState 没什么关系啊,我们上面写的 demo,都没有用到 onRestoreInstanceState,而且,我们目前测试的主要是持久化的部分,并没有测试真正的当 activity 被系统回收时的情况。
那么我们该怎么测试系统回收 activity 的情况呢。。。毕竟现在手机内存都大,哪那么容易测得到这种情况。
两种办法:
- 自己写的 demo 不固定屏幕方向,测试屏幕旋转时候的情况,它一定会调用
onSaveInstanceState和onRestoreInstanceState - 如果我不在 demo 中测试,想自己在线上项目中测试,而这个 app 又不允许屏幕旋转,那么:
在 开发者选项 中开启“不保留活动”,这个“活动”就是 Activity 的翻译 = =。。。还不如不翻。
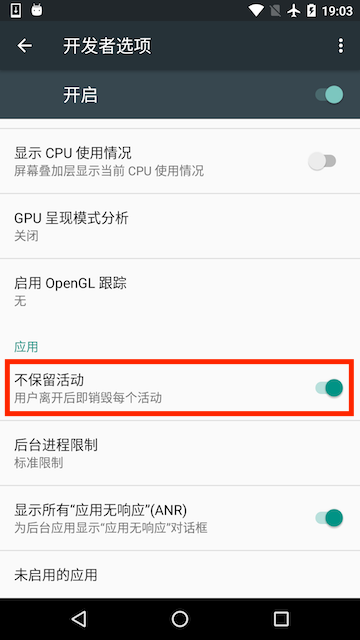
它会在 activity 被放置到后台时就销毁(回收)。那么我们只要按下 home 键就立刻模拟了系统内存不够而回收 activity 的场景。再次回到 activity 时,onSaveInstanceState 就会被调用。
开启后我们测试下我们的 demo。
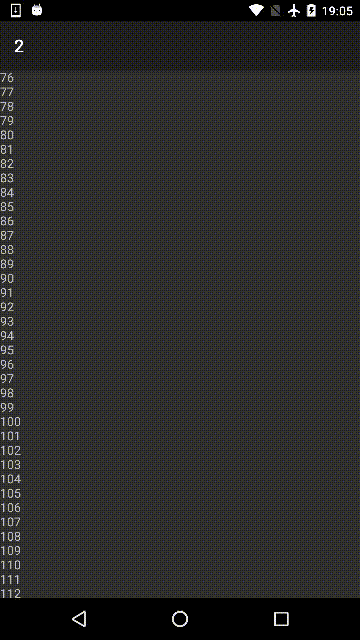
发现之前滚动的位置被恢复了,并没有回到 ScrollView 顶部。然而,我们并没有覆写 onRestoreInstanceState 在里面恢复 ScrollView 的位置,甚至没有在 onSaveInstanceState 中保存什么值啊?
View 也有自己的 onRestoreInstanceState 和 onSaveInstanceState,我们可以看一下 ScrollView 源码:
@Override
protected void onRestoreInstanceState(Parcelable state) {
    if (mContext.getApplicationInfo().targetSdkVersion <= Build.VERSION_CODES.JELLY_BEAN_MR2) {
        // Some old apps reused IDs in ways they shouldn't have.
        // Don't break them, but they don't get scroll state restoration.
        super.onRestoreInstanceState(state);
        return;
    }
    SavedState ss = (SavedState) state;
    super.onRestoreInstanceState(ss.getSuperState());
    mSavedState = ss;
    requestLayout();
}

@Override
protected Parcelable onSaveInstanceState() {
    if (mContext.getApplicationInfo().targetSdkVersion <= Build.VERSION_CODES.JELLY_BEAN_MR2) {
        // Some old apps reused IDs in ways they shouldn't have.
        // Don't break them, but they don't get scroll state restoration.
        return super.onSaveInstanceState();
    }
    Parcelable superState = super.onSaveInstanceState();
    SavedState ss = new SavedState(superState);
    ss.scrollPosition = mScrollY; // 保存滚动位置
    return ss;
}
ScrollView 自己处理的滚动位置的保存与恢复。
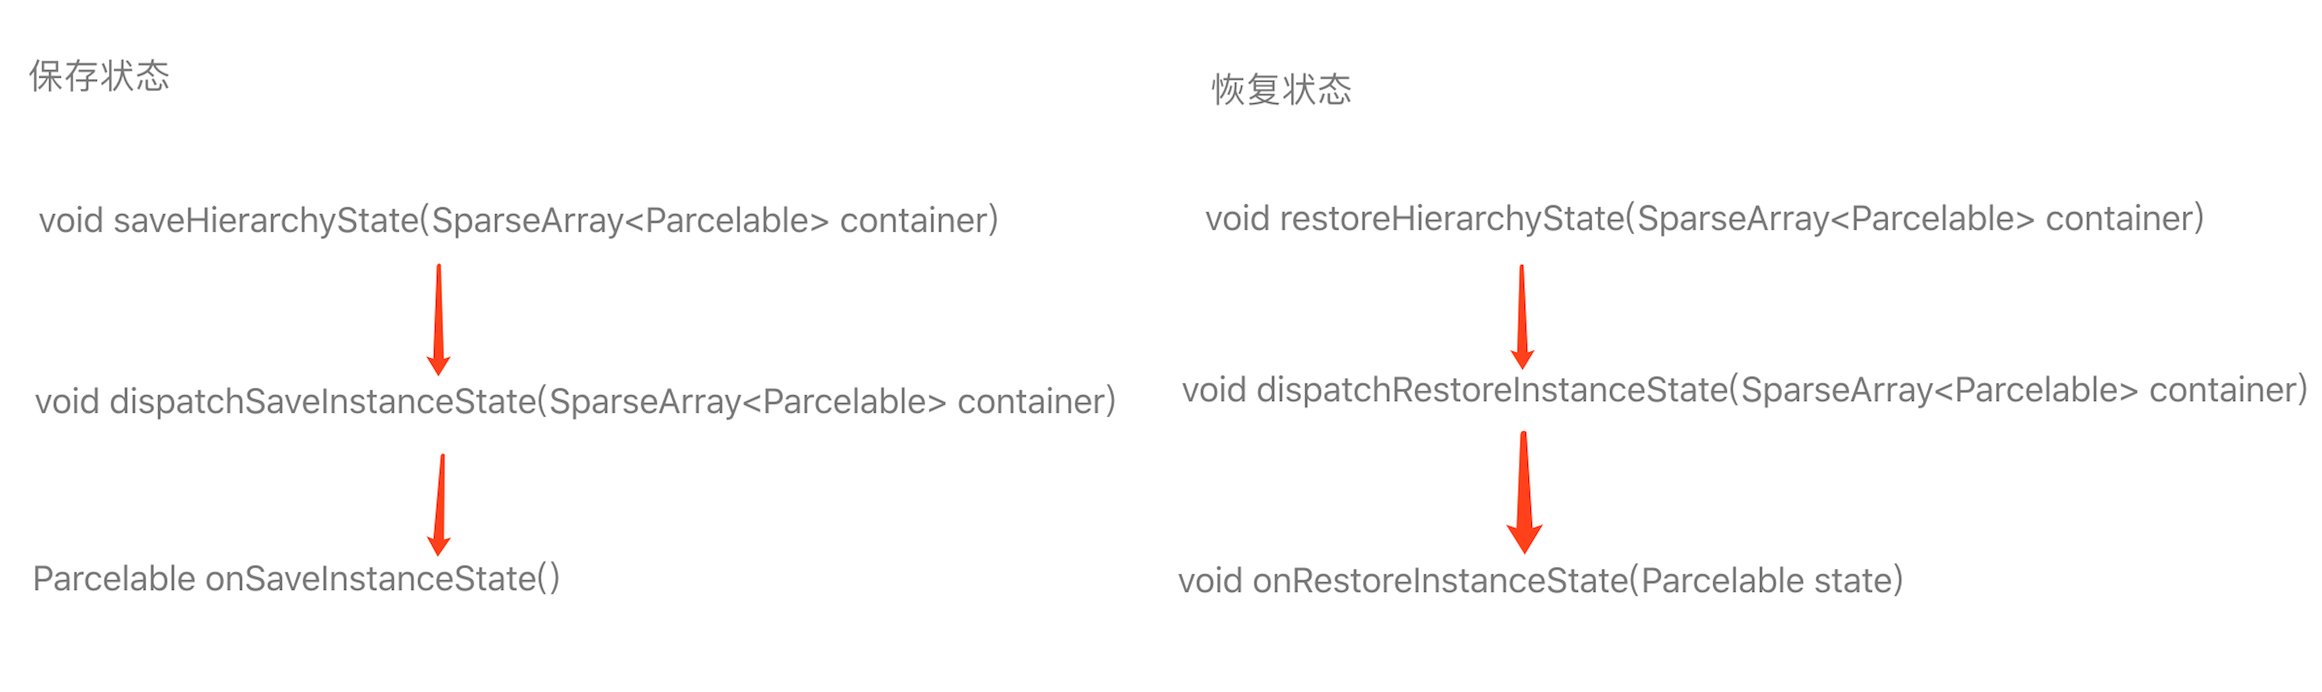
然后 Activity 是怎么保存和恢复 View 的状态的呢?我们可以追溯到 Activity 的 onSaveInstanceState(onRestoreInstanceState 与它是基本类似的逻辑,一个是保存,一个是恢复,所以我们接下来就只看保存的部分):
protected void onSaveInstanceState(Bundle outState) {
    outState.putBundle(WINDOW_HIERARCHY_TAG, mWindow.saveHierarchyState()); // 这里

    outState.putInt(LAST_AUTOFILL_ID, mLastAutofillId);
    Parcelable p = mFragments.saveAllState();
    if (p != null) {
        outState.putParcelable(FRAGMENTS_TAG, p);
    }
    if (mAutoFillResetNeeded) {
        outState.putBoolean(AUTOFILL_RESET_NEEDED, true);
        getAutofillManager().onSaveInstanceState(outState);
    }
    getApplication().dispatchActivitySaveInstanceState(this, outState);
}
它往 Bundle 中存入了 mWindow.saveHierarchyState(),这个 mWindow 就是 PhoneWindow,所以我们接着找 PhoneWindow:
@Override
public Bundle saveHierarchyState() {
    Bundle outState = new Bundle();
    if (mContentParent == null) {
        return outState;
    }

    SparseArray<Parcelable> states = new SparseArray<Parcelable>();
    mContentParent.saveHierarchyState(states); // 这里
    outState.putSparseParcelableArray(VIEWS_TAG, states);

    // Save the focused view ID.
    final View focusedView = mContentParent.findFocus();
    if (focusedView != null && focusedView.getId() != View.NO_ID) {
        outState.putInt(FOCUSED_ID_TAG, focusedView.getId());
    }

    // save the panels
    SparseArray<Parcelable> panelStates = new SparseArray<Parcelable>();
    savePanelState(panelStates);
    if (panelStates.size() > 0) {
        outState.putSparseParcelableArray(PANELS_TAG, panelStates);
    }

    if (mDecorContentParent != null) {
        SparseArray<Parcelable> actionBarStates = new SparseArray<Parcelable>();
        mDecorContentParent.saveToolbarHierarchyState(actionBarStates);
        outState.putSparseParcelableArray(ACTION_BAR_TAG, actionBarStates);
    }

    return outState;
}
这个 mContentParent 是 Window 的 DecorView 上 id 为 com.android.internal.R.id.content 的一个 ViewGroup,在设置了某些 flag 或主题的情况下,它有可能是 DecorView 自身。简而言之,它是我们 setContentView 时内容添加到的 ViewGroup,平时我们往 Activity 填充一个 fragment 时可以这么写:
fragmentManager.beginTransaction().add(android.R.id.content, fragment).commit();
就往 Activity 的 contentView 上添加一个 fragment,省去了为 Activity setContentView 添加只有一个 FrameLayout 的布局的麻烦。
对的这个 mContentParent 就是这个 android.R.id.content 的 View,Activity 的 content 区域的所有 View 都以它为父 ViewGroup。
这个 mContentParent 调用了 saveHierarchyState(states):
public void saveHierarchyState(SparseArray<Parcelable> container) {
    dispatchSaveInstanceState(container);
}

protected void dispatchSaveInstanceState(SparseArray<Parcelable> container) {
    if (mID != NO_ID && (mViewFlags & SAVE_DISABLED_MASK) == 0) {
        mPrivateFlags &= ~PFLAG_SAVE_STATE_CALLED;
        Parcelable state = onSaveInstanceState(); // 这里
        if ((mPrivateFlags & PFLAG_SAVE_STATE_CALLED) == 0) {
            throw new IllegalStateException(
                    "Derived class did not call super.onSaveInstanceState()");
        }
        if (state != null) {
            // Log.i("View", "Freezing #" + Integer.toHexString(mID)
            // + ": " + state);
            container.put(mID, state);
        }
    }
}
绕了一大圈子,总算回到 onSaveInstanceState 了,这还没完,这是 View 的 dispatchSaveInstanceState,对于 ViewGroup:
@Override
protected void dispatchSaveInstanceState(SparseArray<Parcelable> container) {
    super.dispatchSaveInstanceState(container);
    final int count = mChildrenCount;
    final View[] children = mChildren;
    for (int i = 0; i < count; i++) {
        View c = children[i];
        if ((c.mViewFlags & PARENT_SAVE_DISABLED_MASK) != PARENT_SAVE_DISABLED) {
            c.dispatchSaveInstanceState(container);
        }
    }
}
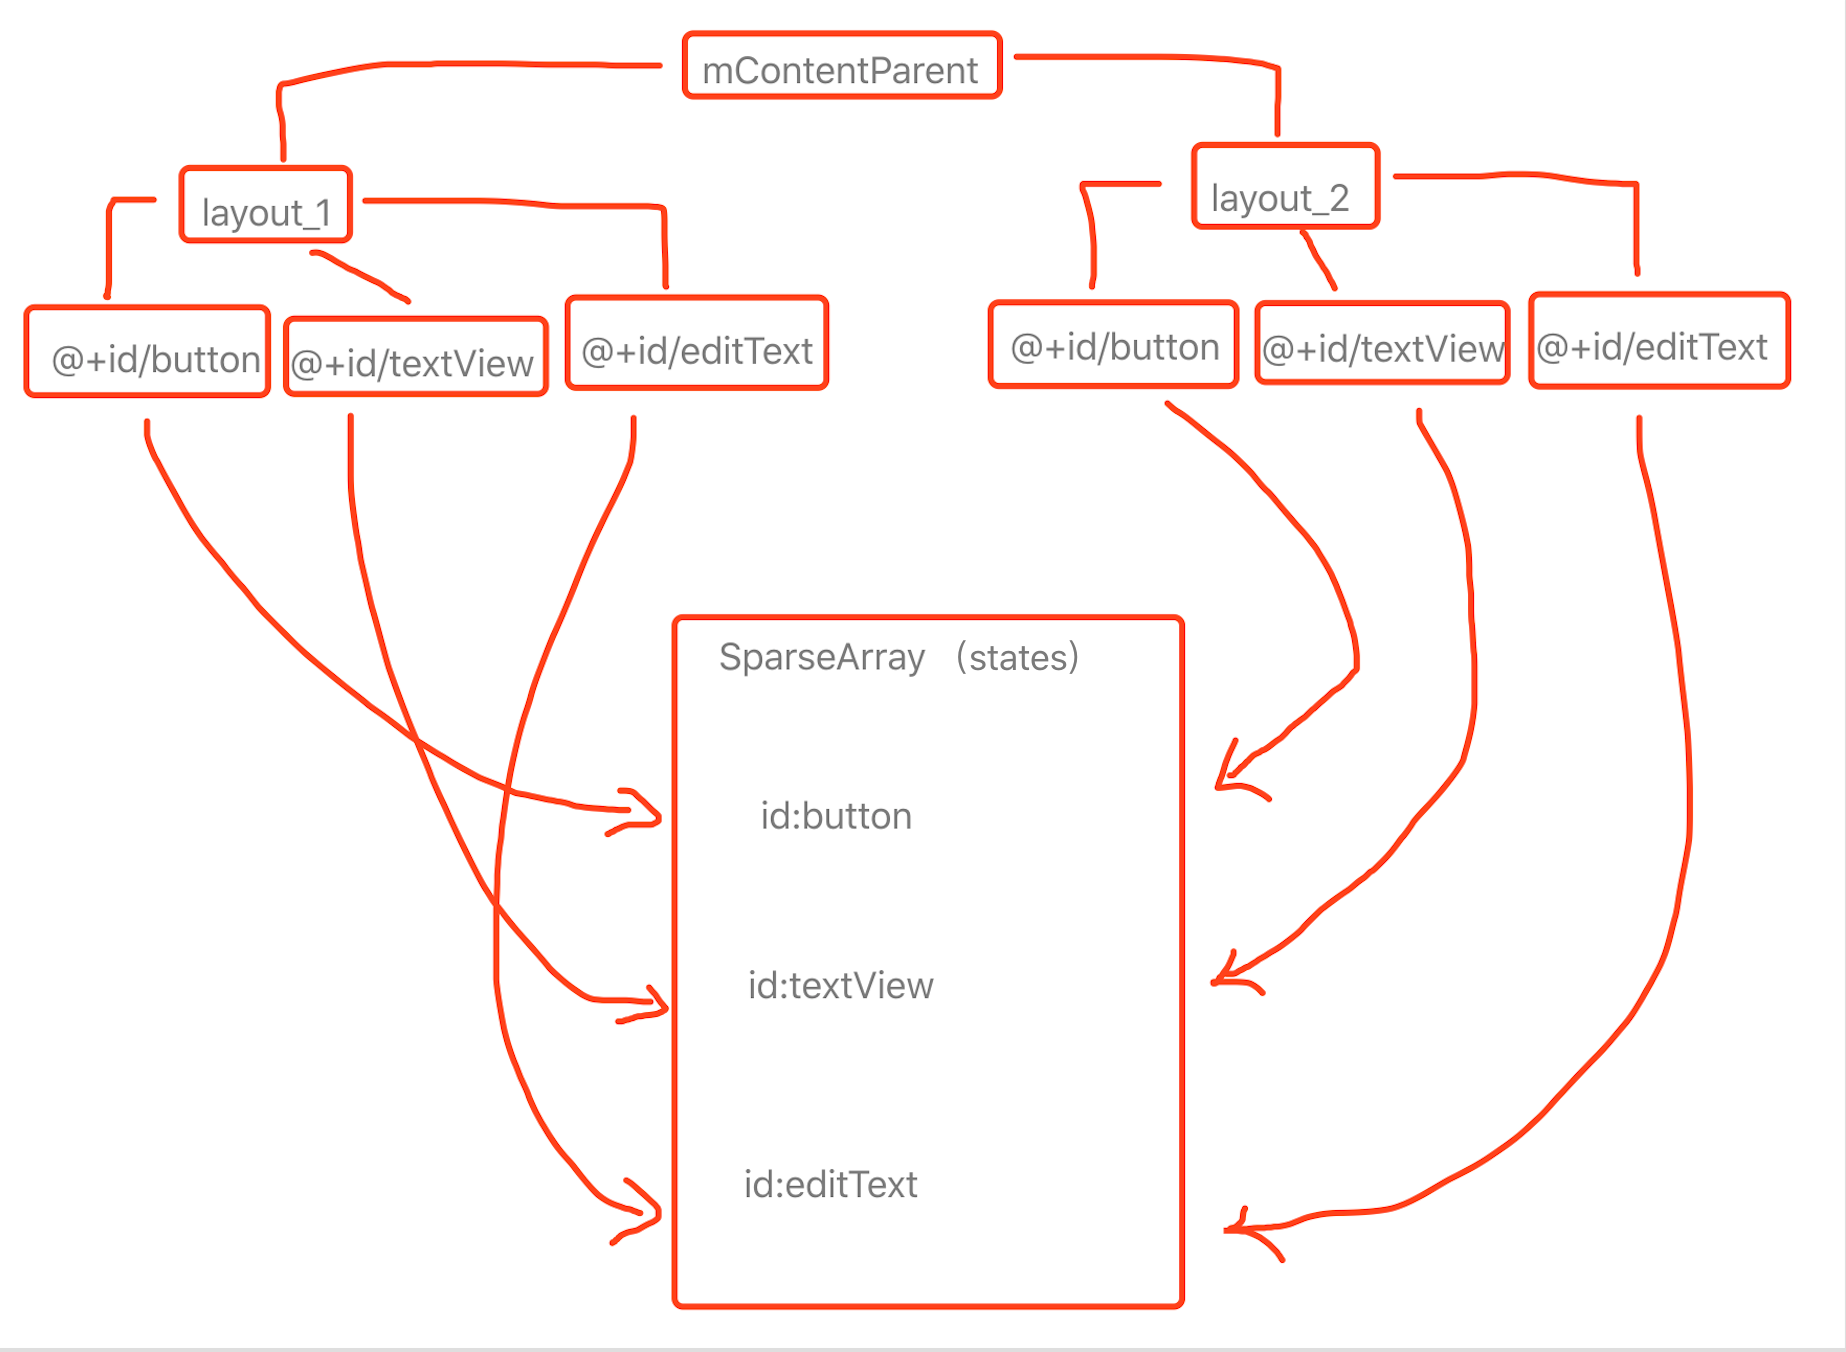
如果还是不太清楚,我们从头屡一遍:
- 因可能发生 Activity 回收而调用 Activity 的
onSaveInstanceState - Activity 的
onSaveInstanceState中调用 PhoneWindow 的saveHierarchyState() - PhoneWindow 的
saveHierarchyState()中调用mContentParent,也就是 Window 的 contentView 的父 ViewGroup,的saveHierarchyState(states) mContentParent的saveHierarchyState(states)会调用dispatchSaveInstanceState(container)mContentParent是一个 ViewGroup,它的dispatchSaveInstanceState(container)会先保存自己的状态,然后调用每一个子 View 的dispatchSaveInstanceState(container)- 对于一个 View 的
dispatchSaveInstanceState(container)中会调用onSaveInstanceState() - ScrollView 的
onSaveInstanceState()中保存了滚动位置信息
这个图展示了 View 部分的 instance state 调用顺序:
因此,我们啥也不写,ScrollView 也能正确地保存和恢复自己的状态。
注意一点:想要一个 View 的状态被自动保存和恢复,必须设置 setSaveEnabled(true)(默认情况下这个 flag 就是 true 的,所以这个用来阻止一个 view 自动保存状态时使用),还必须为这个 View 设置 id,通常是在 xml 中 android:id="@+id/..." 的形式。如果没有设置 id,View 将不会自动处理状态的保存与恢复。原因可以查看上面的 View 的 dispatchSaveInstanceState 代码,一开始就进行了判断:
protected void dispatchSaveInstanceState(SparseArray<Parcelable> container) {
    if (mID != NO_ID && (mViewFlags & SAVE_DISABLED_MASK) == 0) {
        // ...
        Parcelable state = onSaveInstanceState();
        // ...
        if (state != null) {
            // Log.i("View", "Freezing #" + Integer.toHexString(mID)
            // + ": " + state);
            container.put(mID, state);
        }
    }
}
这里首先就判断了 id 不为空且不允许添加 SAVE_DISABLED_MASK flag.
View 的 id 是作为这个用于存储状态的 SparseArray<Parcelable> 的 key 使用的,如果没有设置 id,所有未设置 id 的 View 的 key 都使用 -1 显然是不可能的。
自定义 View 的状态的保存与恢复.
其实对于 Activity 的 onRestoreInstanceState 和 onSaveInstanceState 理解和使用起来还是比较简单的,无非是往传入的 savedInstanceState 和 outState 这两个 Bundle 对象中读写可序列化的对象或基本数据类型变量。
但我们为什么需要自定义 View 处理 onRestoreInstanceState 和 onSaveInstanceState 呢?
在用途上,Activity 和 Fragment 应该保存的是与业务相关的状态。如果所有 View 的状态都交由 Activity 和 Fragment 处理,显然是不可行的,因此就需要 View 自身管理自身的状态,正确的保存和恢复。
它和 Activity 的区别还在于方法签名的不同导致的用法上的区别:
Activity 的:void onRestoreInstanceState(Bundle savedInstanceState) 和 void onSaveInstanceState(Bundle outState)
View 的:void onRestoreInstanceState(Parcelable state) 和 Parcelable onSaveInstanceState()
以及 Fragment 的:void onViewStateRestored(Bundle savedInstanceState) 和 onSaveInstanceState(Bundle outState),fragment 与 activity 的差别只在方法名上,使用起来和 activity 是一样的。
Activity 的参数 Bundle 是一个非抽象类,且都是通过参数传入,使用时只需要调用 Bundle 已有的一堆方法。
View 的参数 Parcelable 是一个接口,没有多少可调用的方法,且 onSaveInstanceState() 时需要返回一个 Parcelable。
所以它使用起来是这样的:
// 需要被保存的自定义状态.
private String mCustomState;

@Override
protected void onRestoreInstanceState(Parcelable state) {
    // 强转 state 为 SavedState 类型,这是安全的,因为保存状态时提供的也是这个类型。
    SavedState ss = (SavedState) state;
    // 恢复 super 状态。
    super.onRestoreInstanceState(ss.getSuperState());
    // 恢复当前自定义的状态。
    mCustomState = ss.customState;
}

@Override
protected Parcelable onSaveInstanceState() {
    // 保存 super 状态。
    Parcelable superState = super.onSaveInstanceState();
    // 创建自定义的 SavedState 并传入 super 的状态和当前自定义的状态。
    SavedState ss = new SavedState(superState, mCustomState);
    // 返回 SavedState。
    return ss;
}

/**
* 自定义状态保存类。
*/
private static class SavedState extends BaseSavedState {
    public final String customState;

    /**
    * 由 Parcelable 使用。
    */
    public SavedState(Parcel source) {
        super(source);
        customState = source.readString();
    }

    /**
    * @param superState Super 的状态。
    * @param customState 自定义的状态。
    */
    public SavedState(Parcelable superState, String customState) {
        super(superState);
        this.customState = customState;
    }

    @Override
    public void writeToParcel(Parcel out, int flags) {
        super.writeToParcel(out, flags);
        out.writeString(customState);
    }

    public static final Parcelable.Creator<SavedState> CREATOR
            = new Parcelable.Creator<SavedState>() {
        public SavedState createFromParcel(Parcel in) {
            return new SavedState(in);
        }

        public SavedState[] newArray(int size) {
            return new SavedState[size];
        }
    };
}
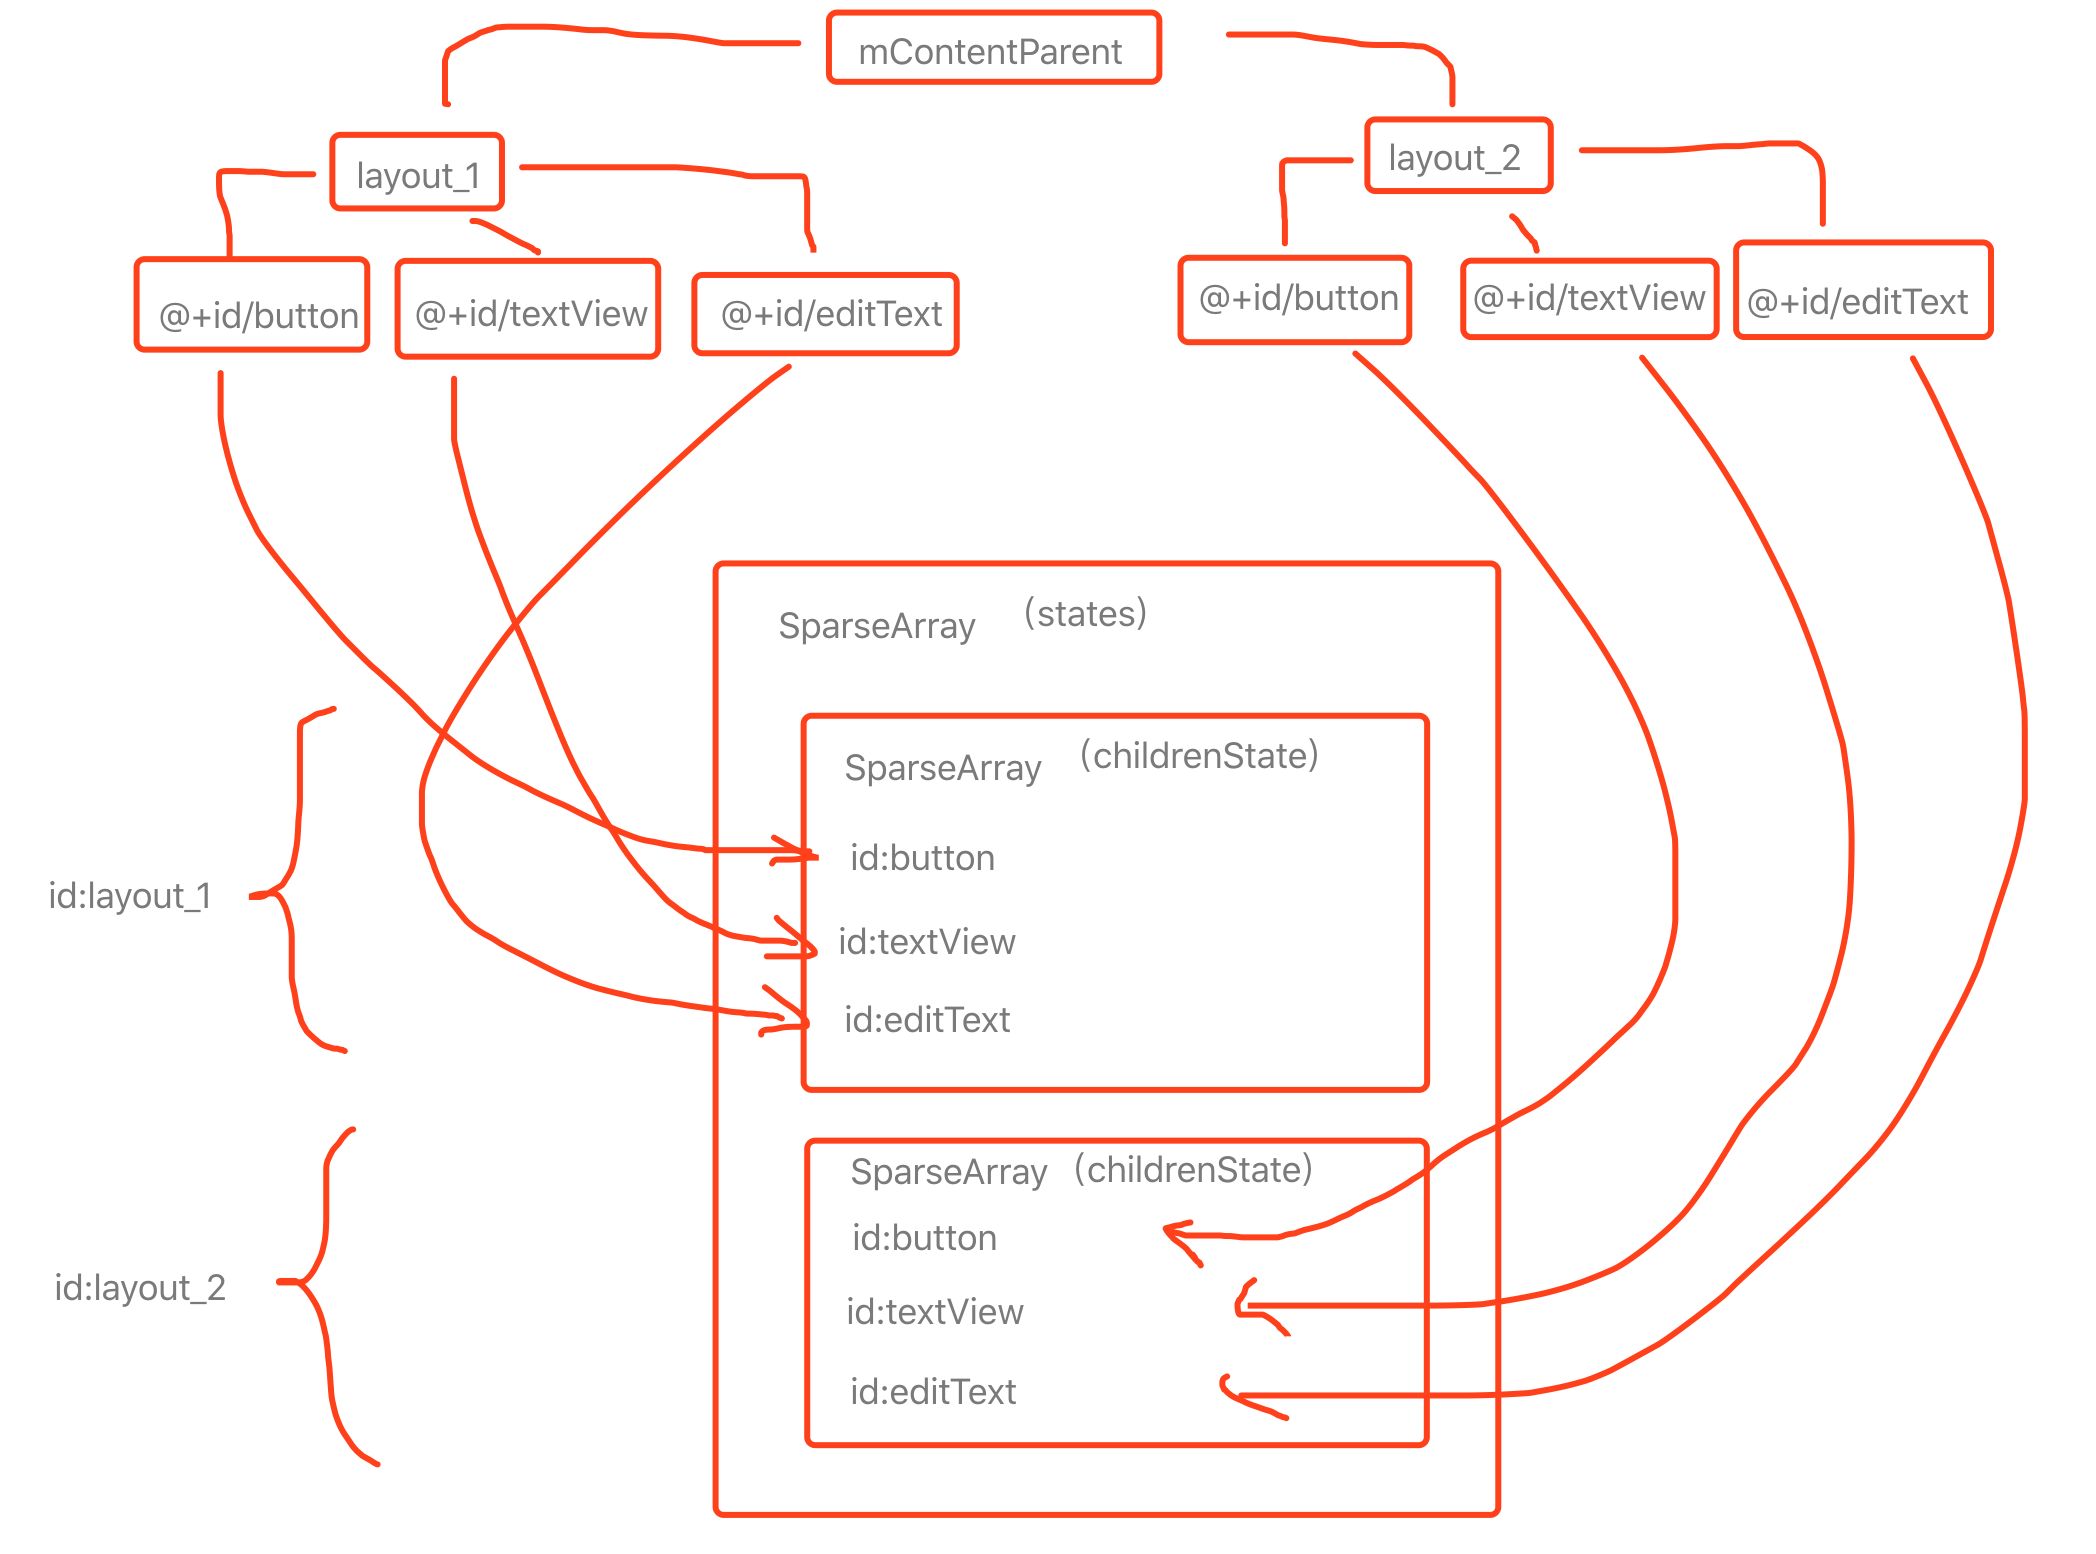
上面我们说,一个 View 必须设置 id 才能被保存和恢复状态,如果同一个 ViewGroup 下的两个 View id 相同呢?
这怎么可能呢?在 layout 文件中,两个 View id 相同会直接报错的。但是,如果使用了 <include> 标签,同时 include 了两个 layout 文件,它们中存在相同的 id,或者干脆我 include 同一个 layout 文件两次,那么这个问题就出现了。虽然这样的情况很少见,甚至 android 自带的 ViewGroup 都没有处理这种情况,但是我们还是要说一下。
如果引用了两个不同的 layout 文件,它们中存在相同的 id,比较简单的方式是,直接修改 id 保证同一个 Activity 内的所有子 View id 都不相同。这需要项目自己做规范。
如果引用了同一个 layout 文件多次,那么这种时候,修改 id 的方式就不可行了,当然,你还是可以复制出来一份 layout,然后修改,啊这不是我想说的。。
有一种解决办法是自定义你所需要的 ViewGroup,修改其中保存子 View 状态的相关方法,然后 layout 文件中使用自定义 ViewGroup。
@Override
protected void dispatchRestoreInstanceState(SparseArray<Parcelable> container) {
    // 阻止 ViewGroup 恢复子 View 的状态,只让 ViewGroup 恢复自己的状态。
    dispatchThawSelfOnly(container);
}

@Override
protected void dispatchSaveInstanceState(SparseArray<Parcelable> container) {
    // 阻止 ViewGroup 保存子 View 的状态,只让 ViewGroup 保存自己的状态。
    dispatchFreezeSelfOnly(container);
}

@Override
protected void onRestoreInstanceState(Parcelable state) {
    SavedState ss = (SavedState) state;
    super.onRestoreInstanceState(ss.getSuperState());
    // 从自己创建的 SparseArray 恢复子 View 的状态,保证了子 View 的状态也在单独的 SparseArray 中。
    for (int i = 0; i < getChildCount(); i++) {
        getChildAt(i).restoreHierarchyState(ss.childrenStates);
    }
}

@Override
protected Parcelable onSaveInstanceState() {
    Parcelable superState = super.onSaveInstanceState();
    SavedState ss = new SavedState(superState);
    // 保存到自己创建的 SparseArray 中。
    for (int i = 0; i < getChildCount(); i++) {
        getChildAt(i).saveHierarchyState(ss.childrenStates);
    }
    return ss;
}

private static class SavedState extends BaseSavedState {
    final SparseArray<Parcelable> childrenStates;

    public SavedState(Parcel source) {
        this(source, null);
    }

    public SavedState(Parcel source, ClassLoader loader) {
        super(source);
        childrenStates = source.readSparseArray(loader);
    }

    public SavedState(Parcelable superState) {
        super(superState);
        childrenStates = new SparseArray<>();
    }

    public static final ClassLoaderCreator<SavedState> CREATOR
            = new ClassLoaderCreator<SavedState>() {
        @Override
        public SavedState createFromParcel(Parcel source) {
            return createFromParcel(source, null);
        }

        @Override
        public SavedState createFromParcel(Parcel source, ClassLoader loader) {
            return new SavedState(source, loader);
        }

        public SavedState[] newArray(int size) {
            return new SavedState[size];
        }
    };
}
其中 dispatchThawSelfOnly(container) 和 dispatchFreezeSelfOnly(container) 的实现如下:
protected void dispatchThawSelfOnly(SparseArray<Parcelable> container) {
    super.dispatchRestoreInstanceState(container);
}

protected void dispatchFreezeSelfOnly(SparseArray<Parcelable> container) {
    super.dispatchSaveInstanceState(container);
}
dispatchRestoreInstanceState 和 dispatchSaveInstanceState 的默认实现如下:
@Override
protected void dispatchRestoreInstanceState(SparseArray<Parcelable> container) {
    super.dispatchRestoreInstanceState(container);
    final int count = mChildrenCount;
    final View[] children = mChildren;
    for (int i = 0; i < count; i++) {
        View c = children[i];
        if ((c.mViewFlags & PARENT_SAVE_DISABLED_MASK) != PARENT_SAVE_DISABLED) {
            c.dispatchRestoreInstanceState(container);
        }
    }
}

@Override
protected void dispatchSaveInstanceState(SparseArray<Parcelable> container) {
    super.dispatchSaveInstanceState(container);
    final int count = mChildrenCount;
    final View[] children = mChildren;
    for (int i = 0; i < count; i++) {
        View c = children[i];
        if ((c.mViewFlags & PARENT_SAVE_DISABLED_MASK) != PARENT_SAVE_DISABLED) {
            c.dispatchSaveInstanceState(container);
        }
    }
}
这两个方法就是放弃 ViewGroup 本来那些保存和恢复子 View 的操作,只简单地调用 ViewGroup 作为 View 自身应该保存和恢复的操作。
还记得 PhoneWindow 中的代码吗:
@Override
public Bundle saveHierarchyState() {
    // ...

    SparseArray<Parcelable> states = new SparseArray<Parcelable>();
    mContentParent.saveHierarchyState(states);

    // ...
}
从根 ViewGroup 开始遍历,所有的 View 的状态都被添加到这个名为 states 的 SparseArray,key 为 view id,value 为状态。这就是整个 layout 下的需要保存状态的 view 需要有 id 且 id 不能重复的原因。而在自定义的 ViewGroup 中,原先应该 put 进公共 states 中的子 View 的状态,被 put 进了自己创建的 childrenStates 这个 SparseArray 中,然后整个 ViewGroup 包括其子 View 的状态被 put 进公共的 states 中,只要 ViewGroup 的 id 不重复,其子 View 的 id 是可以与其他 ViewGroup 中子 View 的 id 相同的。而一个布局 include 两次同一个 layout 文件,它们也需要不同的 id,这就没有问题了。
这是默认情况下 ViewGroup 的实现:
这是自己管理子 View 状态的 ViewGroup 的实现:
系统提供的各个 ViewGroup 默认不会有这样的实现,是为了提高性能,这样的需求,只在必要时使用就好了。
persistentState
从 API 21 开始,Activity 中添加了几个方法:
/**
  * @param persistentState if the activity is being re-initialized after
  *     previously being shut down or powered off then this Bundle contains the data it most
  *     recently supplied to outPersistentState in {@link #onSaveInstanceState}.
  *     <b><i>Note: Otherwise it is null.</i></b>
  */
@Override
public void onCreate(Bundle savedInstanceState, PersistableBundle persistentState) {}

@Override
public void onRestoreInstanceState(Bundle savedInstanceState, PersistableBundle persistentState) {}

@Override
public void onSaveInstanceState(Bundle outState, PersistableBundle outPersistentState) {}
从 api 文档上看,在 Manifest 中配置 android:persistableMode="persistAcrossReboots" 后,这几个方法的 PersistableBundle 是用来在手机重启后仍能恢复状态使用的。
然而在我不成熟的小测试中,它们并没有什么卵用,且不同版本的设备上出现的问题也不相同。
不过即便是它们的确起到了卵用,对于实际的开发而言也仍然没太大实际作用,如果真的希望更长久的保存 app 中的状态数据,应该考虑持久化存储,onRestoreInstanceState 和 onSaveInstanceState 也只是用来暂存的,它不能保证数据不丢失(比如强制停止 app),真正重要的数据是不应该使用 instance state 的。
应用场景
大家有没有发现,平时开发,似乎都不怎么注意到 instance state 的处理,不论是自定义 View,还是在 Activity 或 Fragment 中,都较少关注这几个方法参数。
首先,Android 提供的原生控件,已经很好地帮我们实现的大部分情况下需要的 instance state 的保存与恢复。使用的大部分都是原生控件,不需要额外的处理。
其次,Android 设备内存越来越大,大部分情况下不需要考虑 app 因系统内存紧张而被回收的情况,即使被回收,重新初始化所有数据就好,没有多少恢复状态的必要。并且,受各种因素影响,多数 app 基本 ui 模型都是底部 4 到 5 个 tab,这样的应用 ui 结构在横屏的显示效果是不太好的,也没有太大必要的,因此,大部分应用的屏幕方向都固定写死了。没有回收和屏幕旋转,平时我们很难注意到对状态的处理,因为它不是能很直观地看的出来的东西。
因此就现有的应用结构,完全不处理 onRestoreInstanceState 和 onSaveInstanceState 也能应付大部分情况。
当开发者选项中的“不保留活动”开启后,模拟系统回收 Activity 的场景,其实大部分 app 都有多多少少的适配问题。

因此为了更好的用户体验,以及可能的部分页面横竖屏切换的需要(其实一个应用能支持横竖屏切换也是用户体验的一部分),理解掌握 instance state 还是有必要的。